A sandwich maker, also known as a sandwich press, is a kitchen appliance that is used to make grilled sandwiches. It consists of two hinged plates that press and heat the sandwich, creating a crispy exterior and melted interior. Sandwich makers are available in various types and sizes, with different features and capabilities.
Tips for Choosing Best Sandwich Maker

When it comes to choosing the best sandwich maker, there are several factors to consider. Here are some tips to help you make the right choice:
- Size: Consider how many sandwiches you want to make at once and how much counter space you have available. Choose a sandwich maker that suits your needs and fits comfortably in your kitchen.
- Type of plates: Sandwich makers come with different types of plates, such as ridged, flat or interchangeable. Think about what types of sandwiches you want to make and choose a sandwich maker with plates that suit your needs.
- Non-stick coating: A non-stick coating makes it easier to clean the sandwich maker and prevents food from sticking. Look for a sandwich maker with a high-quality non-stick coating.
- Temperature control: Some sandwich makers have temperature control settings, which allows you to adjust the heat according to the type of sandwich you’re making. This can be useful for making different types of sandwiches.
- Durability: Choose a sandwich maker made of high-quality materials that are durable and long-lasting. Read reviews and choose a brand with a good reputation for producing high-quality appliances.
- Price: Sandwich makers come in a wide range of prices. Determine your budget and choose a sandwich maker that offers good value for money and suits your needs.
By considering these factors, you can choose a sandwich maker that meets your needs and helps you create delicious sandwiches quickly and easily.
10 Best Sandwich Makers For You
There are several types of sandwich makers available in the market, each with its own unique features and capabilities. Here are some of the most common types:
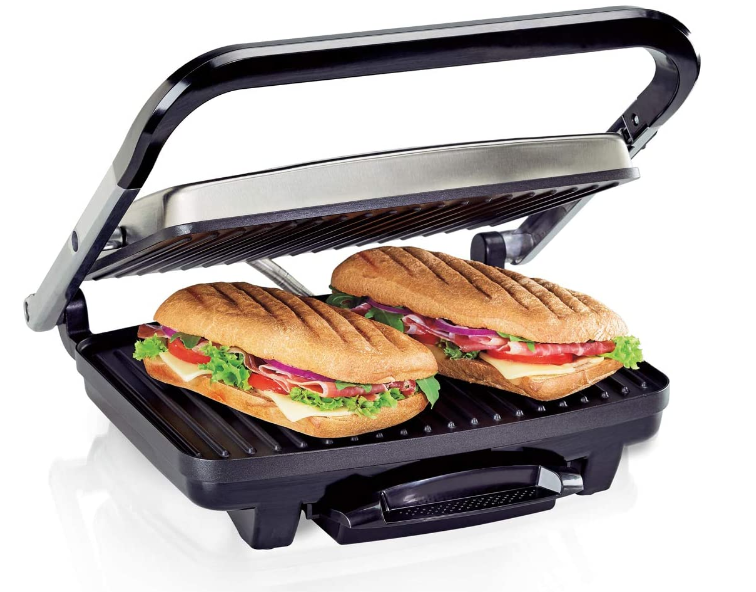
1. Panini Press
A panini press is a sandwich maker with ridged plates that leave grill marks on the sandwich. This type of sandwich maker is perfect for making paninis, grilled cheese sandwiches, and other grilled sandwiches.
How it Works?
Here’s how Panini Press works:
- Preheat the panini press: Turn on the panini press and let it preheat for a few minutes until it reaches the desired temperature. The temperature can usually be adjusted using a temperature control knob or switch.
- Prepare the sandwich: Prepare the sandwich by layering your ingredients between two slices of bread or a roll. You can use any combination of ingredients you like, including meat, cheese, vegetables, and condiments.
- Place the sandwich on the press: Open the panini press and place the sandwich on the bottom plate. Close the press and apply pressure to the top of the sandwich using the handle or lever.
- Grill the sandwich: Cook the sandwich for a few minutes on the press until the bread is toasted and the cheese is melted. The exact cooking time will depend on the type of sandwich you’re making and the temperature of the press.
- Serve and enjoy: Open the press and remove the sandwich using a spatula. Cut the sandwich in half and serve hot.
Overall, a Panini press is a convenient and easy-to-use appliance that can be used to make a variety of delicious grilled sandwiches quickly and easily.
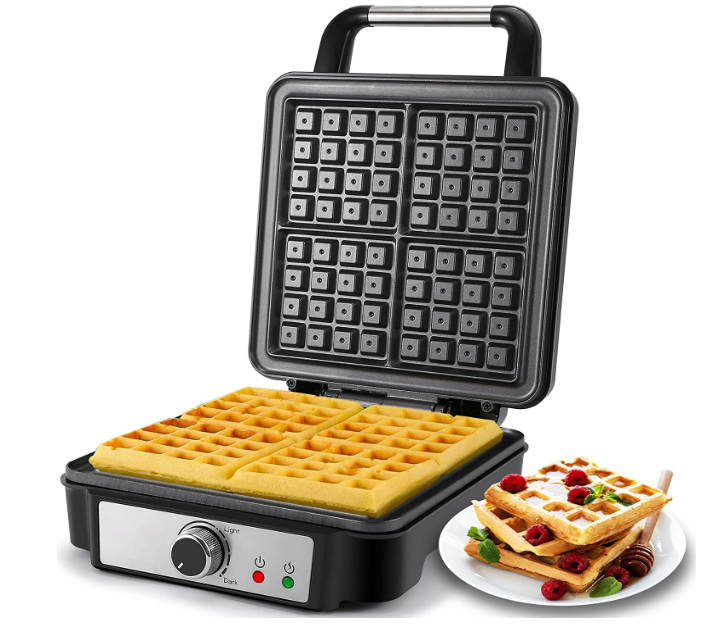
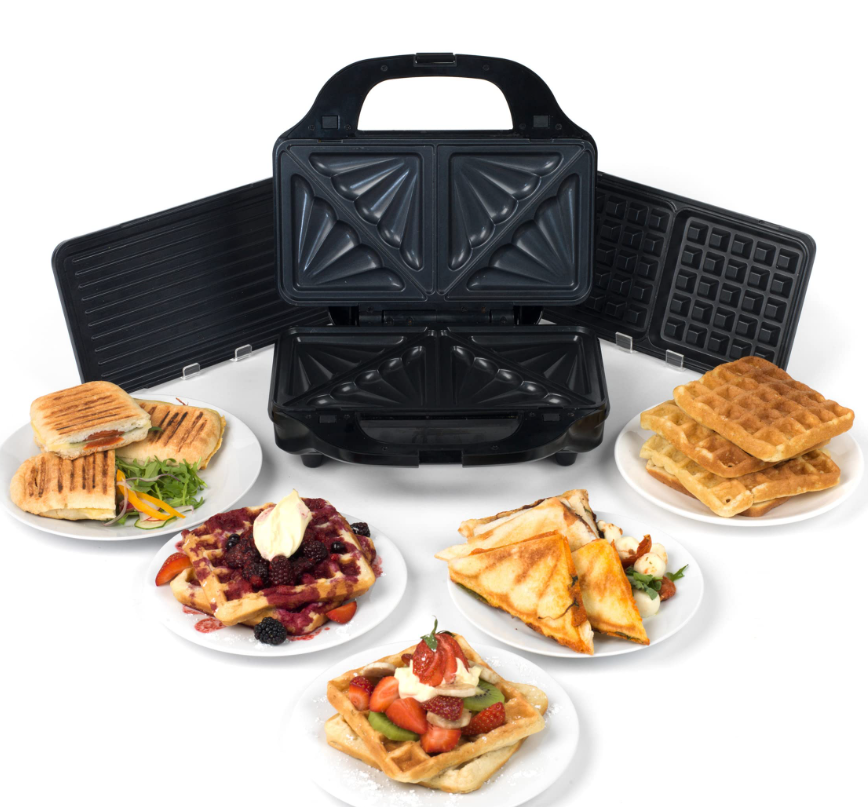
2. Four-Square Waffle Maker
A four-square waffle maker can be used to make waffles as well as sandwiches. This type of sandwich maker has four square plates that can be used to make four sandwiches at once.
How it Works?
Here’s how Four-Square Waffle Maker works:
- Preheat the waffle maker: Turn on the waffle maker and let it preheat for a few minutes until it reaches the desired temperature. Most models have an indicator light that will turn on when the waffle maker is ready.
- Prepare the waffle batter: Mix together the ingredients for your waffle batter according to your recipe. The batter should be thick but pourable.
- Pour the batter onto the waffle plates: Open the waffle maker and pour the batter onto the center of each of the four waffle plates. Be careful not to overfill the plates, as the batter will expand as it cooks.
- Close the waffle maker: Close the waffle maker and apply gentle pressure to the lid to help spread the batter evenly.
- Cook the waffles: Cook the waffles for a few minutes, or until the indicator light turns off and the waffles are golden brown and crisp. The exact cooking time will depend on the temperature of your waffle maker and the thickness of your waffles.
- Serve and enjoy: Open the waffle maker and use a fork or spatula to remove the waffles from the plates. Serve hot with your favorite toppings, such as butter, syrup, fruit, or whipped cream.
Overall, a four-square waffle maker is a convenient and easy-to-use appliance that can be used to make delicious homemade waffles quickly and easily. With four plates, it can cook multiple waffles at once, making it a great option for feeding a crowd or meal prepping.
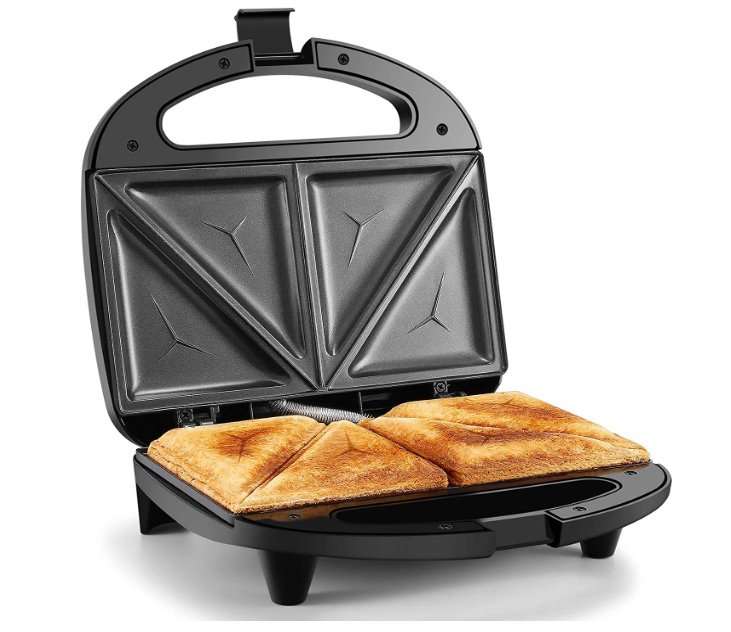
3. Classic Two-Square Sandwich Maker
A classic two-square sandwich maker is a simple and affordable option for making small sandwiches. This type of sandwich maker has two square plates that press and heat the sandwich.
How it Works?
Here’s how Classic Two-Square Sandwich Maker works:
- Preheat the sandwich maker: Turn on the sandwich maker and let it preheat for a few minutes until it reaches the desired temperature. Most models have an indicator light that will turn on when the sandwich maker is ready.
- Prepare the sandwich: Prepare your sandwich by layering ingredients such as meat, cheese, vegetables, and condiments between two slices of bread or a roll.
- Place the sandwich on the press: Open the sandwich maker and place the sandwich on the bottom plate. Close the press and apply pressure to the top of the sandwich using the handle or lever.
- Grill the sandwich: The hot plates of the sandwich maker apply heat and pressure to the sandwich, which helps to toast the bread and melt the cheese. Cook the sandwich for a few minutes on the press until the bread is toasted and the cheese is melted.
- Serve and enjoy: Open the sandwich maker and remove the sandwich using a spatula. Cut the sandwich in half and serve hot.
Overall, a classic two-square sandwich maker is a convenient and easy-to-use appliance that can be used to make delicious grilled sandwiches quickly and easily. With two plates, it can cook one or two sandwiches at once, making it a great option for a quick and easy lunch or snack.
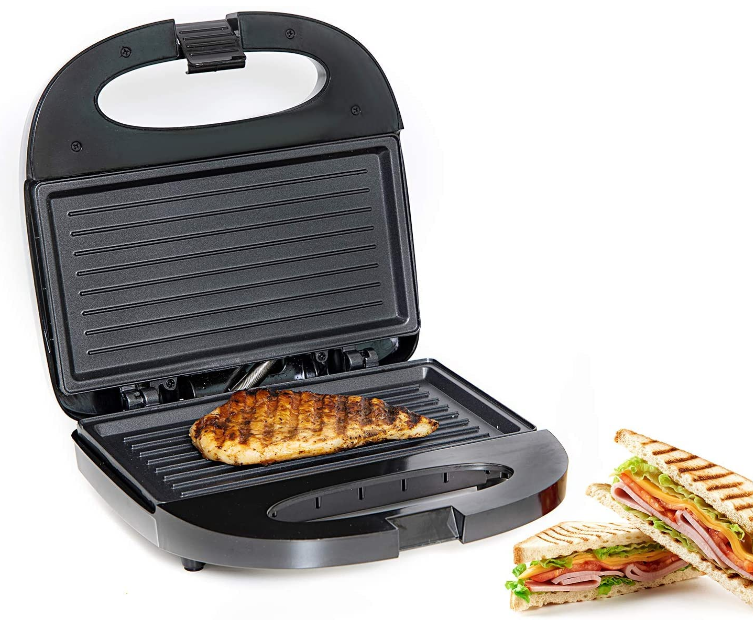
4. Flat Grill Sandwich Maker
A flat grill sandwich maker has a flat cooking surface that is ideal for making open-faced sandwiches or heating up tortillas. This type of sandwich maker is also great for making quesadillas.
How it Works?
Here’s how flat grill sandwich maker works:
- Preheat the grill: Turn on the flat grill sandwich maker and let it preheat for a few minutes until it reaches the desired temperature. Most models have an indicator light that will turn on when the grill is ready.
- Prepare the sandwich: Prepare your sandwich by layering ingredients such as meat, cheese, vegetables, and condiments between two slices of bread or a roll.
- Place the sandwich on the grill: Open the sandwich maker and place the sandwich on the bottom plate. Close the press and apply pressure to the top of the sandwich using the handle or lever.
- Grill the sandwich: The hot plates of the sandwich maker apply heat and pressure to the sandwich, which helps to toast the bread and melt the cheese. Cook the sandwich for a few minutes on the grill until the bread is toasted and the cheese is melted.
- Serve and enjoy: Open the sandwich maker and remove the sandwich using a spatula. Cut the sandwich in half and serve hot.
Overall, a flat grill sandwich maker is a versatile and easy-to-use appliance that can be used to cook a variety of foods. With a flat surface, it can be used to grill sandwiches, burgers, and other food items. Additionally, some models have adjustable temperature settings and removable plates, which can make them even more versatile and convenient to use.
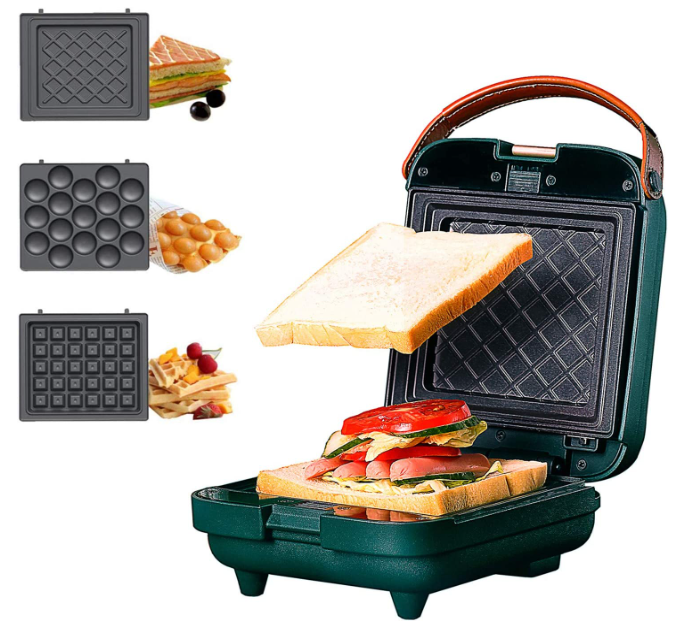
5. Interchangeable Plate Sandwich Maker
An interchangeable plate sandwich maker allows you to switch out the plates to make different types of sandwiches. This type of sandwich maker can be used to make waffles, pancakes, and even grilled vegetables.
How it Works?
Here’s how interchangeable plate sandwich maker works:
- Choose the plates: Choose the plates that you want to use based on the food you want to cook. Many models come with plates for grilling sandwiches, making waffles, cooking pancakes, and more.
- Preheat the sandwich maker: Turn on the sandwich maker and let it preheat for a few minutes until it reaches the desired temperature. Most models have an indicator light that will turn on when the sandwich maker is ready.
- Prepare the food: Prepare your food according to your recipe. For example, if you are making waffles, mix together the waffle batter.
- Place the food on the plates: Open the sandwich maker and place the food on the bottom plate. Close the press and apply pressure to the top of the food using the handle or lever.
- Cook the food: The hot plates of the sandwich maker apply heat and pressure to the food, cooking it evenly on both sides. Cook the food for a few minutes on the plates until it is done.
- Serve and enjoy: Open the sandwich maker and remove the food using a spatula. Serve hot and enjoy!
Overall, an interchangeable plate sandwich maker is a convenient and versatile appliance that can be used to cook a variety of foods quickly and easily. With interchangeable plates, it can be used to cook sandwiches, waffles, pancakes, and more, making it a great addition to any kitchen.
6. Multi-Function Sandwich Maker
A multi-function sandwich maker can be used to make a variety of different foods, including sandwiches, waffles, omelets, and more. This type of sandwich maker usually comes with interchangeable plates.
How it Works?
Here’s how multi-function sandwich maker works:
- Choose the function: Select the function you want to use on the sandwich maker. Many models come with interchangeable plates that can be easily switched out to perform different cooking tasks.
- Preheat the sandwich maker: Turn on the sandwich maker and let it preheat for a few minutes until it reaches the desired temperature. Most models have an indicator light that will turn on when the sandwich maker is ready.
- Prepare the food: Prepare your food according to your recipe. For example, if you are making waffles, mix together the waffle batter.
- Place the food on the plates: Open the sandwich maker and place the food on the bottom plate. Close the press and apply pressure to the top of the food using the handle or lever.
- Cook the food: The hot plates of the sandwich maker apply heat and pressure to the food, cooking it evenly on both sides. Cook the food for a few minutes on the plates until it is done.
- Serve and enjoy: Open the sandwich maker and remove the food using a spatula. Serve hot and enjoy!
Overall, a multi-function sandwich maker is a convenient and versatile appliance that can be used to cook a variety of foods quickly and easily. With multiple functions and interchangeable plates, it can be used to cook sandwiches, waffles, eggs, and more, making it a great addition to any kitchen.
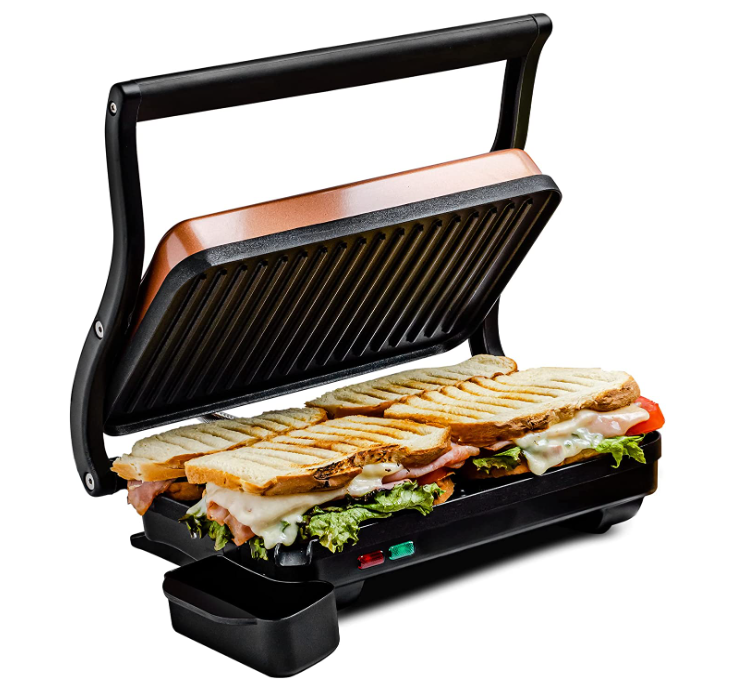
7. Electric Grill Sandwich Maker
An electric grill sandwich maker has a grill plate that allows you to cook meat, vegetables, and other ingredients in addition to making sandwiches.
How it Works?
Here’s a detailed explanation of how an electric grill sandwich maker works:
- Heating Elements: An electric grill sandwich maker typically consists of two hinged plates with heating elements embedded within them. When the sandwich maker is turned on, these elements heat up, providing a high heat source for cooking.
- Non-stick Coating: The plates of the sandwich maker are coated with a non-stick material to prevent the bread or fillings from sticking to the plates while cooking.
- Assembly of Sandwich: To make a sandwich, you need to assemble the ingredients between two slices of bread. Once the sandwich is assembled, you can place it on the lower plate of the sandwich maker.
- Cooking: Once the sandwich is in place, you can close the lid of the sandwich maker, which brings the upper plate down onto the sandwich. The heat from the heating elements cooks the sandwich from both sides simultaneously, toasting the bread and heating the fillings inside.
- Indicator Light: Most electric grill sandwich makers come with an indicator light that turns on when the sandwich is done, usually after a few minutes of cooking.
- Removal of Sandwich: Once the sandwich is done, you can open the lid of the sandwich maker and remove the sandwich using a spatula. Be careful, as the plates may still be hot.
- Cleaning: After use, you should unplug the sandwich maker and let it cool before cleaning. Many models come with removable plates that can be washed in the sink or dishwasher, while others require wiping down with a damp cloth.
Overall, an electric grill sandwich maker is a quick and convenient way to make delicious toasted sandwiches at home. Its heating elements and non-stick coating make cooking easy and ensure that the sandwich doesn’t stick to the plates.
8. Contact Grill Sandwich Maker
A contact grill sandwich maker has two hinged plates that press the sandwich and cook it from both sides. This type of sandwich maker is perfect for making grilled cheese sandwiches and other hot sandwiches.

How it Works?
Here’s how contact grill sandwich maker works:
- Heating Elements: The contact grill sandwich maker has two heated plates that heat up when the appliance is turned on.
- Non-stick Coating: The plates are coated with a non-stick material to prevent the bread or fillings from sticking to the plates while cooking.
- Assembly of Sandwich: To make a sandwich, you need to assemble the ingredients between two slices of bread. Once the sandwich is assembled, you can place it on the lower plate of the sandwich maker.
- Cooking: Once the sandwich is in place, you can close the lid of the sandwich maker, which brings the upper plate down onto the sandwich. The heat from the heating elements cooks the sandwich from both sides simultaneously, toasting the bread and heating the fillings inside.
- Adjustable Height: Many contact grill sandwich makers have an adjustable height feature that allows you to control how much pressure is applied to the sandwich, allowing you to customize the level of toasting and heating.
- Indicator Light: Most contact grill sandwich makers come with an indicator light that turns on when the sandwich is done, usually after a few minutes of cooking.
- Removal of Sandwich: Once the sandwich is done, you can open the lid of the sandwich maker and remove the sandwich using a spatula. Be careful, as the plates may still be hot.
- Cleaning: After use, you should unplug the sandwich maker and let it cool before cleaning. Many models come with removable plates that can be washed in the sink or dishwasher, while others require wiping down with a damp cloth.
Overall, a contact grill sandwich maker is a great way to make delicious toasted sandwiches and paninis at home. Its heating elements and non-stick coating make cooking easy and ensure that the sandwich doesn’t stick to the plates.
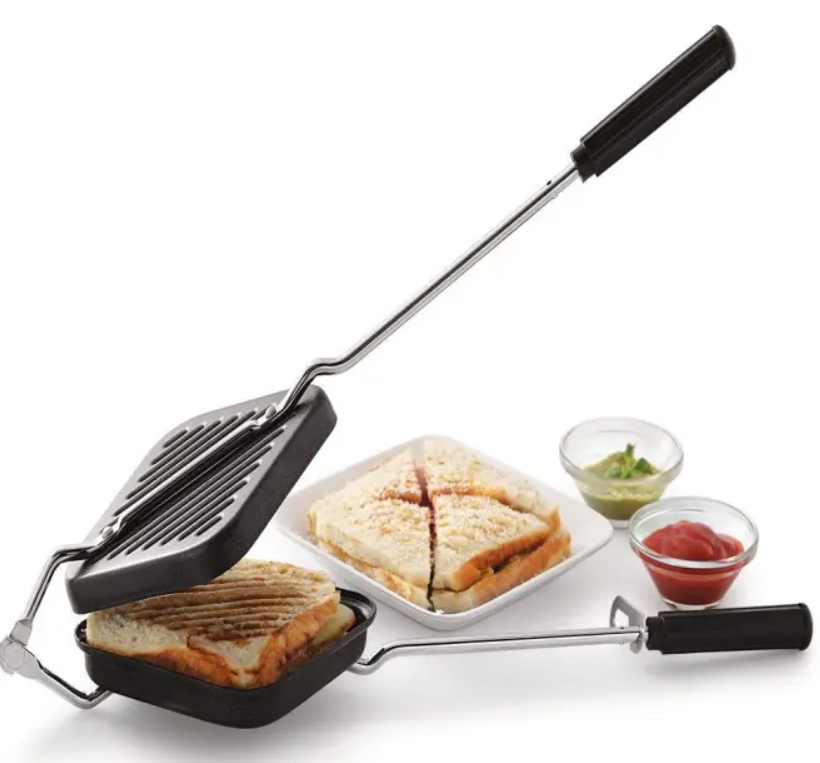
9. Toaster sandwich maker
A toaster sandwich maker is a type of toaster that has a sandwich cage that allows you to make hot sandwiches quickly and easily.
How it Works?
Here’s how a toaster sandwich maker works:
- Heating Elements: The toaster sandwich maker typically has two heated plates that heat up when the appliance is turned on.
- Non-stick Coating: The plates are coated with a non-stick material to prevent the bread or fillings from sticking to the plates while cooking.
- Assembly of Sandwich: To make a sandwich, you need to assemble the ingredients between two slices of bread. Once the sandwich is assembled, you can place it inside the toaster sandwich maker.
- Cooking: Once the sandwich is in place, you can close the lid of the sandwich maker, which brings the upper plate down onto the sandwich. The heat from the heating elements cooks the sandwich from both sides simultaneously, toasting the bread and heating the fillings inside.
- Indicator Light: Many toaster sandwich makers come with an indicator light that turns on when the sandwich is done, usually after a few minutes of cooking.
- Removal of Sandwich: Once the sandwich is done, you can open the lid of the sandwich maker and remove the sandwich using a spatula. Be careful, as the plates may still be hot.
- Cleaning: After use, you should unplug the toaster sandwich maker and let it cool before cleaning. Many models come with removable plates that can be washed in the sink or dishwasher, while others require wiping down with a damp cloth.
Overall, a toaster sandwich maker is a convenient and easy-to-use appliance that can make delicious toasted sandwiches in just a few minutes. Its heating elements and non-stick coating make cooking easy and ensure that the sandwich doesn’t stick to the plates.
10. Microwave Sandwich Maker
A microwave sandwich maker is a special container that allows you to make hot sandwiches in the microwave. This type of sandwich maker is a convenient and easy-to-use option for making sandwiches at home or at work.
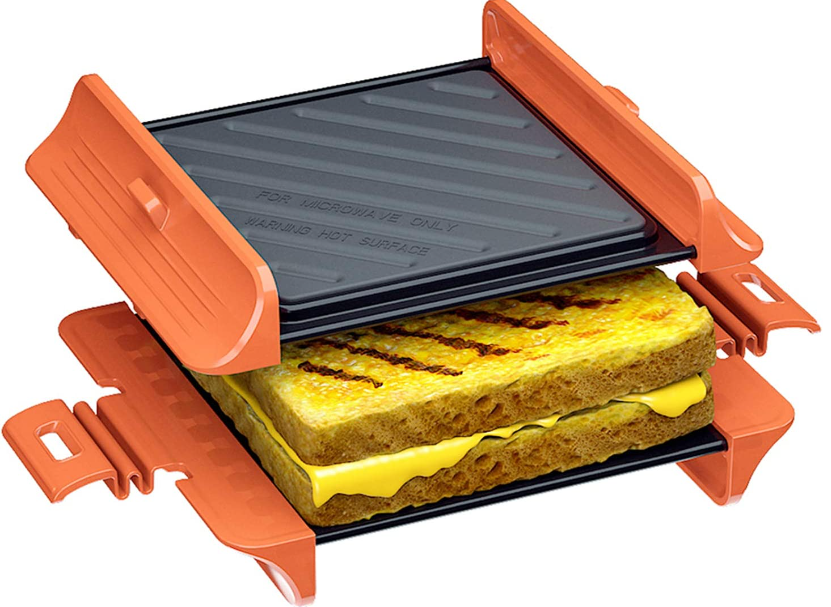
How it Works?
Here’s how a microwave sandwich maker works:
- Assembly of Sandwich: To make a sandwich, you need to assemble the ingredients between two slices of bread. Once the sandwich is assembled, you can place it inside the microwave sandwich maker.
- Microwave Safe Material: The microwave sandwich maker is made of microwave-safe materials such as plastic or silicone, which allow the sandwich to be cooked in the microwave.
- Cooking: Once the sandwich is in place, you can put the sandwich maker in the microwave and set the cooking time according to the instructions. The microwave will heat the sandwich from all sides, cooking the bread and heating the fillings inside.
- Ventilation: Many microwave sandwich makers come with ventilation holes that allow steam to escape during cooking, preventing the bread from becoming soggy.
- Removal of Sandwich: Once the sandwich is done, you can remove the sandwich maker from the microwave and remove the sandwich using a spatula. Be careful, as the sandwich maker and the sandwich may still be hot.
- Cleaning: After use, you should wash the microwave sandwich maker with warm soapy water or place it in the dishwasher.
Overall, a microwave sandwich maker is a convenient and easy-to-use appliance that can make delicious sandwiches in just a few minutes. It is especially useful for those who don’t have access to a stove or grill, as it allows you to cook a sandwich in a microwave oven. The microwave-safe materials and ventilation holes make cooking easy and ensure that the sandwich is cooked evenly.