
Having a small kitchen can be a challenge when it comes to storage, as there may not be enough room to store all of your cookware, utensils, and ingredients. However, with some creativity and organization, you can make the most of your limited space and create a functional and efficient kitchen.
One of the first steps to maximizing your small kitchen storage is to declutter and get rid of items that you no longer use or need. This will free up space for the items that you do need and use on a regular basis.
Next, you can consider adding storage solutions such as hanging racks, magnetic knife strips, and shelves. These can help keep your countertops clear and make use of vertical space.
Finally, organizing your cabinets and drawers can make a big difference in how much you can store in your kitchen. Using drawer dividers, stacking items, and utilizing the backs of cabinet doors are just a few ways to make the most of your cabinet and drawer space. With these small kitchen storage ideas, you can make your kitchen feel bigger and more functional.
10 Storage Ideas For Small Kitchen
1. Use wall-mounted shelves

Wall-mounted shelves are a great way to maximize vertical space in your small kitchen. They can be installed above your countertops or even above your stove or sink area. Here are some details on how to use wall-mounted shelves for small kitchen storage:
- Choose the right shelves: Consider the size and style of your kitchen when choosing shelves. You can choose from wood, metal, or glass shelves in various sizes and shapes. Be sure to measure your available space and choose shelves that fit your needs.
- Install the shelves: Installing wall-mounted shelves is a straightforward process. You will need a drill, screws, and wall anchors. Be sure to locate the studs in the wall and mark the placement of your shelves before drilling. Follow the instructions carefully and use a level to ensure that your shelves are installed straight.
- Organize your items: Once your shelves are installed, it’s time to organize your items. You can use baskets, jars, or other containers to store items like spices, cooking oils, and utensils. Be sure to group like items together to make them easier to find.
- Keep it tidy: One of the downsides of open shelving is that it can quickly become cluttered. To keep your shelves looking neat and organized, be sure to put items back in their proper place after each use. You can also use decorative items like plants or artwork to break up the monotony of your storage items.
Overall, wall-mounted shelves are a great way to add storage to your small kitchen while keeping your countertops clear. They are affordable, easy to install, and can be customized to fit your needs and style.
2. Add a rolling cart
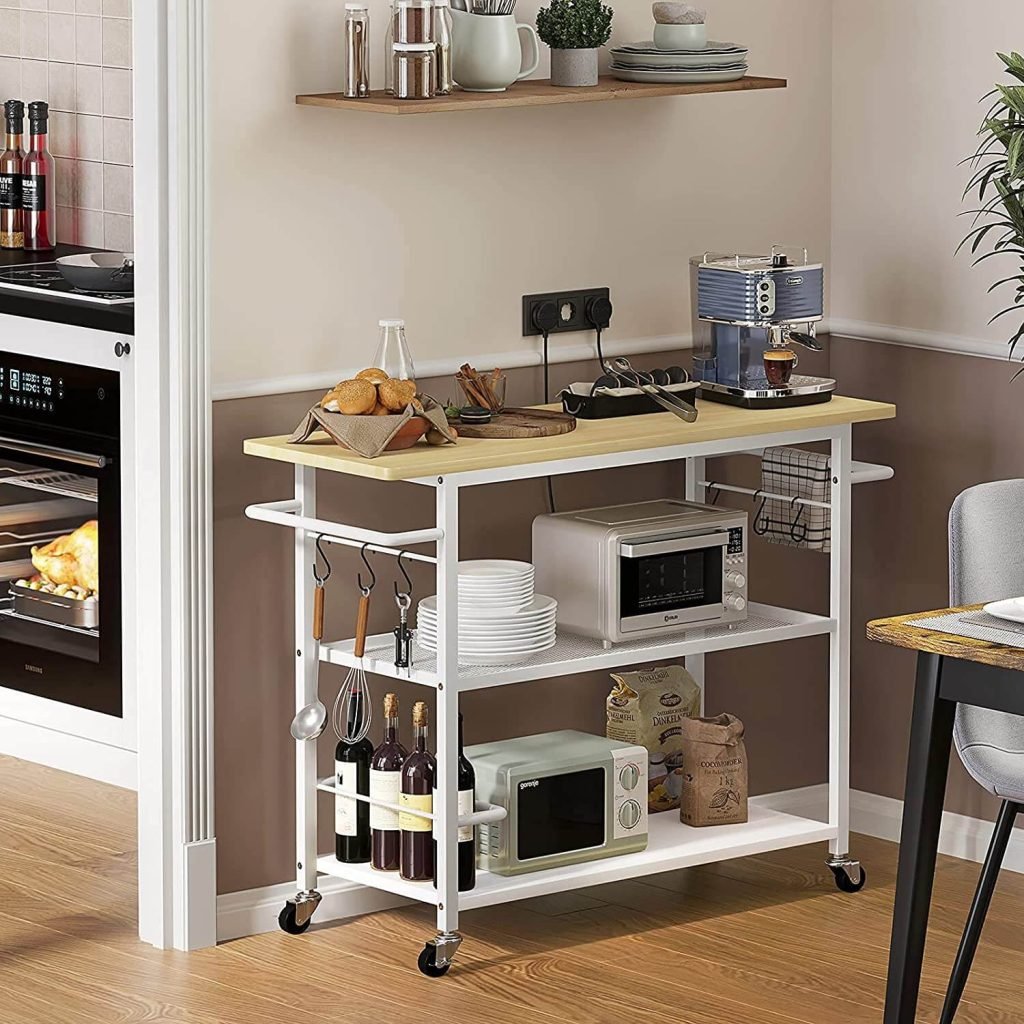
Adding a rolling cart is a great way to create additional storage in a small kitchen. Here are some details on how to use a rolling cart for small kitchen storage:
- Choose the right cart: Rolling carts come in a variety of sizes, styles, and materials. Consider the size of your kitchen, your storage needs, and your style when choosing a cart. Look for a cart that has shelves, drawers, or both to maximize storage space.
- Determine the placement: Before bringing the cart into your kitchen, determine where you want it to go. You may want to keep it near your stove or in a corner where it won’t get in the way. Be sure to measure the space to ensure that the cart will fit.
- Organize your items: Once you have your cart in place, it’s time to organize your items. Use the shelves and drawers to store items like cookware, utensils, and small appliances. You can also use baskets or containers to group like items together.
- Keep it tidy: A rolling cart can quickly become cluttered if you don’t stay organized. Be sure to put items back in their proper place after each use and avoid storing items on top of the cart. You can also use decorative items like a small plant or a colorful tea towel to add a personal touch.
- Move it as needed: One of the benefits of a rolling cart is that you can move it around your kitchen as needed. If you’re cooking a large meal, you can move the cart closer to your stove. If you need more counter space, you can move the cart out of the way.
Overall, a rolling cart is a versatile storage solution that can be customized to fit your small kitchen storage needs. It’s affordable, easy to move, and can be a stylish addition to your kitchen décor.
3. Use magnetic knife strips
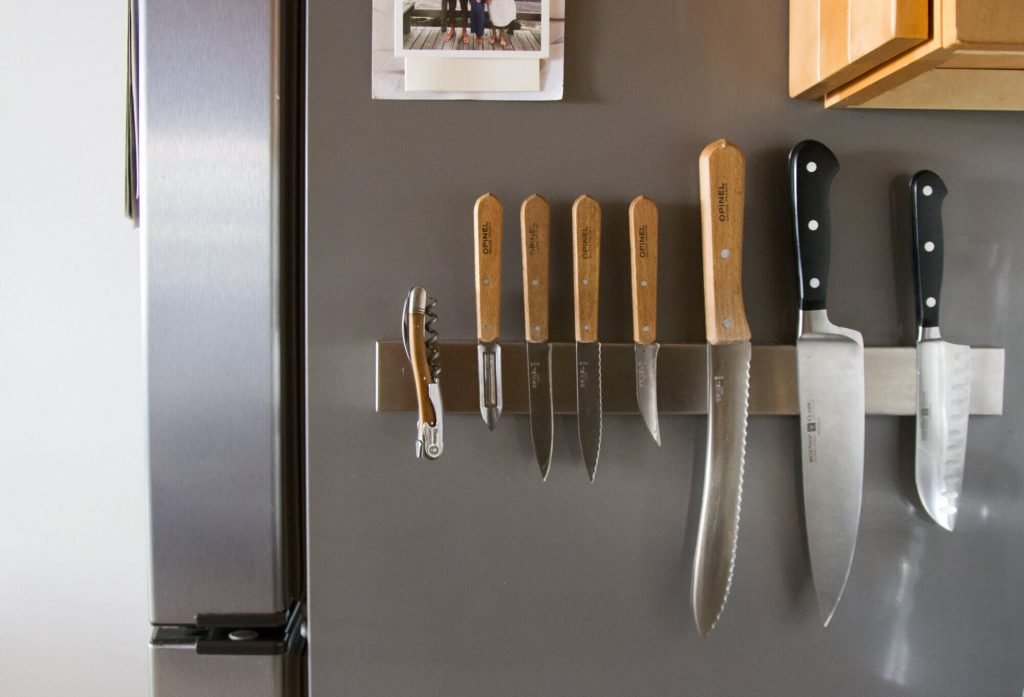
Using magnetic knife strips is a smart way to store your kitchen knives and free up counter space. Here are some details on how to use magnetic knife strips for small kitchen storage:
- Choose the right strip: Magnetic knife strips come in a variety of lengths, materials, and styles. Choose one that is long enough to accommodate all of your knives and that fits your kitchen décor. Common materials include wood, stainless steel, and plastic.
- Determine the placement: Before installing your magnetic knife strip, determine where you want it to go. It’s important to choose a location that is easily accessible and away from children or pets. You can install it on the wall near your countertop or above your stove.
- Install the strip: Installing a magnetic knife strip is a simple process. You will need a drill, screws, and wall anchors. Be sure to follow the instructions carefully and use a level to ensure that the strip is installed straight.
- Organize your knives: Once your magnetic knife strip is installed, it’s time to organize your knives. Place them on the strip with the sharp side facing up. Be sure to group like knives together to make them easier to find.
- Keep it clean: To keep your magnetic knife strip clean and free of debris, wipe it down regularly with a damp cloth. Avoid using harsh cleaners that could damage the strip.
Overall, using a magnetic knife strip is a safe and convenient way to store your kitchen knives. It’s a space-saving solution that keeps your knives organized and easily accessible.
4. Install a pot rack
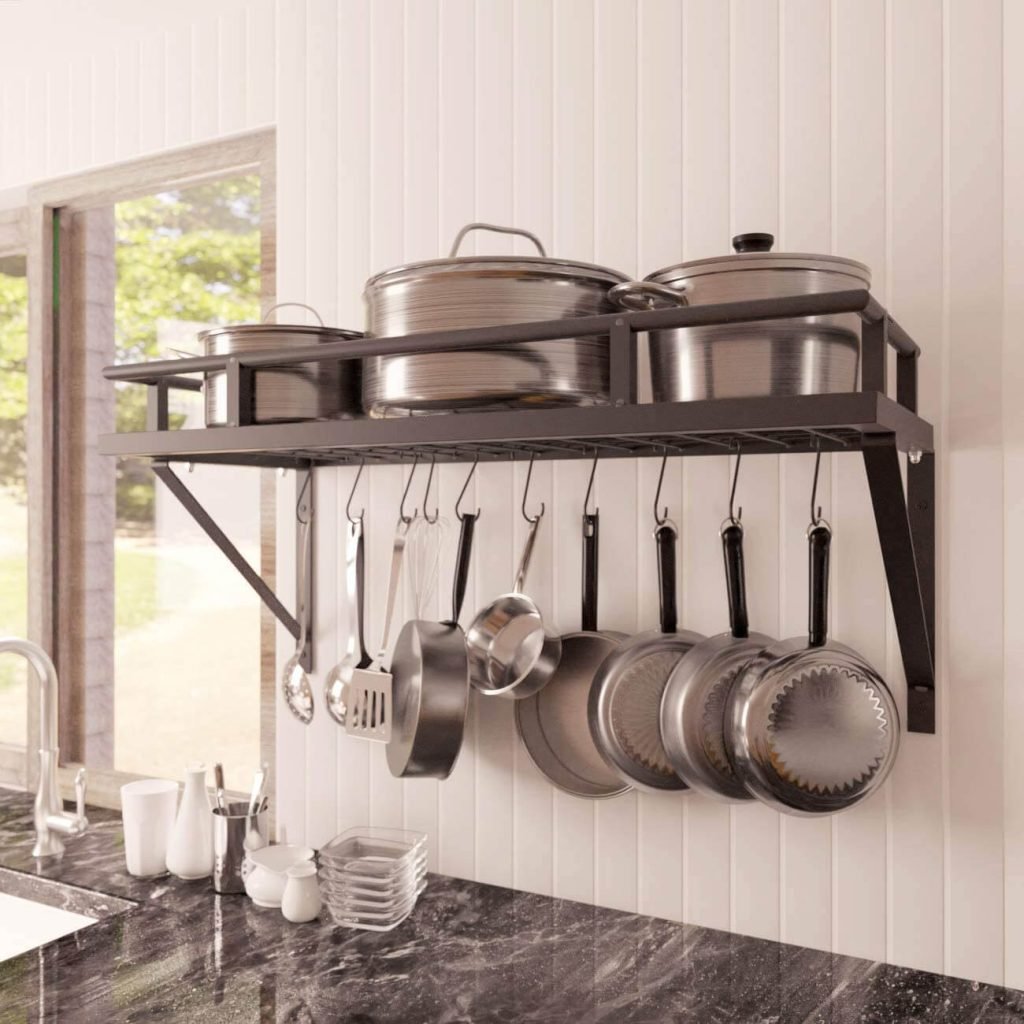
Installing a pot rack is a great way to free up cabinet space and create additional storage in your small kitchen. Here are some details on how to install a pot rack for small kitchen storage:
- Choose the right rack: Pot racks come in a variety of styles and sizes. Choose one that fits your kitchen décor and that can accommodate all of your pots and pans. Consider the weight limit of the pot rack and make sure it can handle the weight of your cookware.
- Determine the placement: Before installing your pot rack, determine where you want it to go. It’s important to choose a location that is easily accessible and away from children or pets. You can install it above your stove, above an island, or in a corner.
- Install the rack: Installing a pot rack is a more involved process than other small kitchen storage solutions. You will need to use a stud finder to locate the ceiling joists and drill pilot holes for the mounting hardware. Follow the instructions carefully and use a level to ensure that the pot rack is installed straight.
- Organize your pots and pans: Once your pot rack is installed, it’s time to organize your pots and pans. Hang them from the pot rack with the handles facing down. Be sure to group like items together to make them easier to find.
- Keep it tidy: A pot rack can quickly become cluttered if you don’t stay organized. Be sure to put pots and pans back in their proper place after each use and avoid stacking them on top of each other.
Overall, a pot rack is a stylish and functional storage solution that can help you make the most of your small kitchen space. It’s a great way to keep your pots and pans organized and easily accessible while freeing up valuable cabinet space.
5. Use under-cabinet storage

Using under-cabinet storage is a smart way to create additional storage space in your small kitchen. Here are some details on how to use under-cabinet storage for small kitchen storage:
- Choose the right storage solution: There are a variety of under-cabinet storage solutions to choose from, including wire baskets, hooks, and magnetic strips. Choose one that fits your storage needs and kitchen décor.
- Determine the placement: Before installing your under-cabinet storage, determine where you want it to go. It’s important to choose a location that is easily accessible and away from heat sources. You can install it under your cabinets near your stove or above your sink.
- Install the storage: Installing under-cabinet storage is a simple process. Depending on the type of storage solution you choose, you may need to use screws, adhesive strips, or magnets. Be sure to follow the instructions carefully and use a level to ensure that the storage is installed straight.
- Organize your items: Once your under-cabinet storage is installed, it’s time to organize your items. Use wire baskets to store items like cutting boards, baking sheets, and spices. Hang hooks to store utensils, mugs, or pot holders. Use magnetic strips to store knives or other metal utensils.
- Keep it tidy: Under-cabinet storage can quickly become cluttered if you don’t stay organized. Be sure to put items back in their proper place after each use and avoid overloading the storage. You can also use decorative items like a small plant or a colorful tea towel to add a personal touch.
Overall, using under-cabinet storage is a great way to maximize your small kitchen space. It’s an affordable and easy-to-install solution that can help you keep your kitchen organized and clutter-free.
6. Utilize the back of cabinet doors
Utilizing the back of cabinet doors is a smart way to create additional storage space in your small kitchen. Here are some details on how to use the back of cabinet doors for small kitchen storage:
- Choose the right storage solution: There are a variety of storage solutions to choose from, including wire racks, adhesive hooks, and magnetic strips. Choose one that fits your storage needs and kitchen décor.
- Determine the placement: Before installing your storage solution, determine where you want it to go. It’s important to choose a location that is easily accessible and away from heat sources. You can install it on the inside of your cabinet doors or on the outside if you have enough clearance.
- Install the storage: Installing storage on the back of cabinet doors is a simple process. Depending on the type of storage solution you choose, you may need to use screws, adhesive strips, or magnets. Be sure to follow the instructions carefully and use a level to ensure that the storage is installed straight.
- Organize your items: Once your storage is installed, it’s time to organize your items. Use wire racks to store items like cleaning supplies, cutting boards, or plastic wrap. Hang hooks to store utensils, measuring cups, or pot holders. Use magnetic strips to store spices or other metal items.
- Keep it tidy: Storage on the back of cabinet doors can quickly become cluttered if you don’t stay organized. Be sure to put items back in their proper place after each use and avoid overloading the storage. You can also use decorative items like a small plant or a colorful tea towel to add a personal touch.
Overall, utilizing the back of cabinet doors is a great way to maximize your small kitchen space. It’s an affordable and easy-to-install solution that can help you keep your kitchen organized and clutter-free.
7. Use drawer dividers
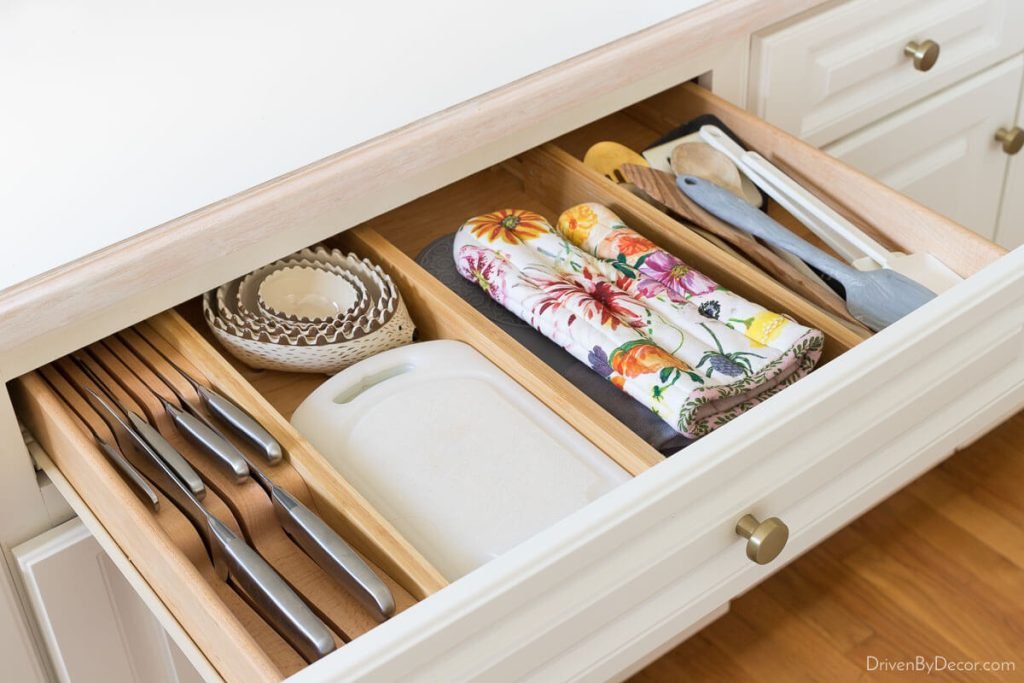
Using drawer dividers is a simple yet effective way to create additional storage space and keep your small kitchen organized. Here are some details on how to use drawer dividers for small kitchen storage:
- Determine the purpose: Before choosing the right drawer dividers, determine the purpose of the drawer. Do you want to store utensils, spices, or baking tools? This will help you choose the right type of divider.
- Choose the right divider: There are a variety of drawer dividers available, including bamboo, plastic, and metal. Choose one that fits your needs and the size of your drawer.
- Measure the drawer: Measure the width, depth, and height of the drawer before purchasing the divider. This will ensure that it fits properly and maximizes the available space.
- Install the divider: Once you have the divider, it’s time to install it in the drawer. Follow the manufacturer’s instructions carefully and make sure it is securely in place.
- Organize your items: Once your divider is installed, it’s time to organize your items. Use separate compartments to store utensils, spices, or baking tools. This will make it easier to find what you need and keep your drawer clutter-free.
- Keep it tidy: It’s important to keep your drawer organized and tidy. Be sure to put items back in their proper place after each use and avoid overloading the drawer. You can also use decorative items like drawer liners or labels to add a personal touch.
Using drawer dividers is an affordable and easy-to-install solution that can help you make the most of your small kitchen space. It’s a great way to keep your kitchen organized and clutter-free while also ensuring that you can find what you need quickly and easily.
8. Get creative with pantry storage
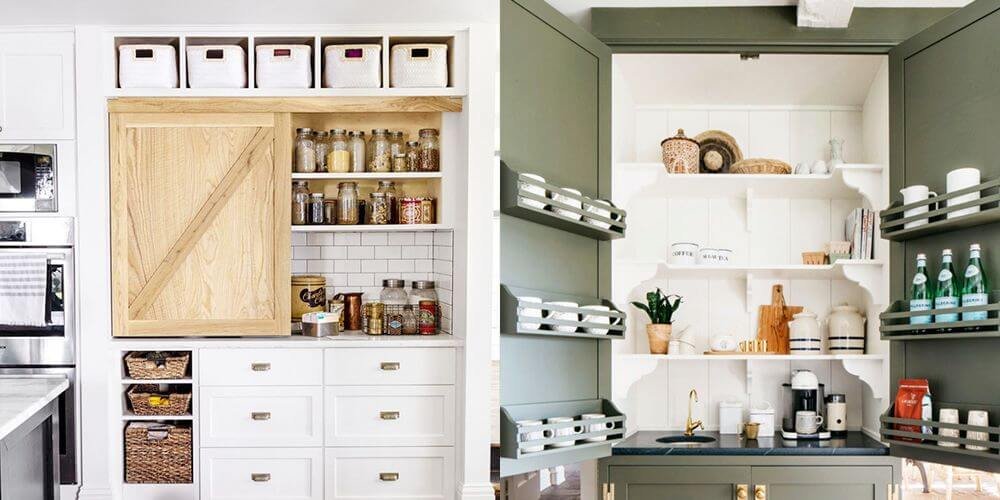
If you have a small kitchen, getting creative with pantry storage can be a game-changer in terms of organization and space-saving. Here are some details on how to get creative with pantry storage:
- Utilize vertical space: One of the best ways to maximize pantry storage is to utilize vertical space. Install shelves all the way up to the ceiling, or use hanging organizers to store items like snacks or condiments.
- Use baskets or bins: Baskets or bins are a great way to organize and store items in your pantry. Group similar items together, like snacks or baking supplies, and use a basket or bin to keep them all in one place.
- Install a door organizer: A door organizer can be a great way to add additional storage to your pantry. Use it to store spices, canned goods, or other small items that tend to get lost in the shuffle.
- Create zones: Creating zones in your pantry can help you keep everything organized and easy to find. Group similar items together, like baking supplies or snacks, and label each zone to make it easier to find what you need.
- Use adjustable shelving: Adjustable shelving can be a great way to make the most of your pantry space. You can adjust the shelves to fit your items, which helps to avoid wasted space.
- Add lighting: If your pantry is dark, it can be difficult to find what you need. Adding lighting, like battery-operated LED lights, can make a big difference and make it easier to find what you need.
- Repurpose other items: Repurpose items from other areas of your home to use in your pantry. For example, an over-the-door shoe organizer can be used to store snacks or spices.
Getting creative with pantry storage is a great way to make the most of your small kitchen space. By utilizing vertical space, using baskets or bins, installing a door organizer, creating zones, using adjustable shelving, adding lighting, and repurposing other items, you can create an organized and functional pantry that works for you.
9. Hang a pegboard

Hanging a pegboard is a great way to add storage and organization to your small kitchen. Here are some details on how to hang a pegboard:
- Choose the right size: The first step in hanging a pegboard is to choose the right size for your space. Measure the area where you want to hang the pegboard and choose a size that fits.
- Gather your supplies: You will need a pegboard, pegboard hooks, a drill, screws, and wall anchors. Make sure you have all the necessary supplies before beginning.
- Determine the location: Choose a location for your pegboard that is easily accessible and won’t interfere with other kitchen tasks. Make sure there is enough space around the pegboard to add and remove hooks as needed.
- Mark the location: Use a pencil to mark the location for your pegboard on the wall. Use a level to ensure it is straight.
- Install wall anchors: Drill holes into the wall where you marked the location for the pegboard. Insert wall anchors into the holes to provide additional support for the pegboard.
- Install the pegboard: Hold the pegboard up to the wall and attach it using screws. Make sure it is securely attached to the wall.
- Add hooks: Once your pegboard is securely attached to the wall, add hooks to hang your kitchen items. You can use a variety of hooks, including straight hooks, angled hooks, and double hooks.
- Organize your items: Use the hooks to hang your kitchen items, like pots, pans, utensils, and cutting boards. Organize them in a way that makes sense for you, like grouping similar items together.
Hanging a pegboard is an affordable and easy way to add storage and organization to your small kitchen. By choosing the right size, gathering your supplies, determining the location, marking the location, installing wall anchors, installing the pegboard, adding hooks, and organizing your items, you can create a functional and stylish kitchen storage solution that works for you.
10. Use transparent containers
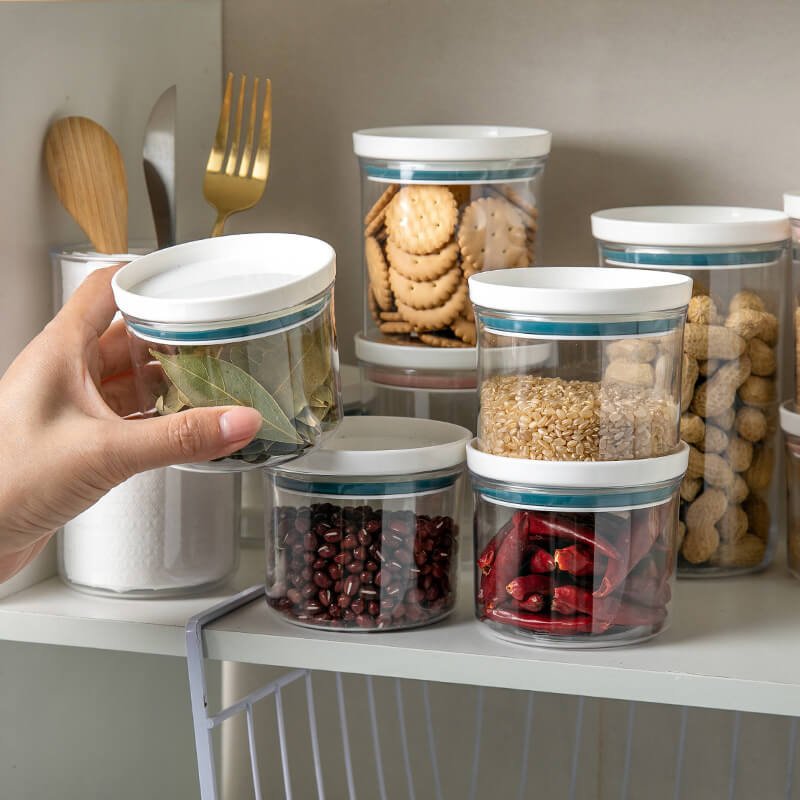
Using transparent containers in your small kitchen can be a great way to save space and stay organized. Here are some details on how to use transparent containers:
- Choose the right containers: When selecting containers, choose ones that are transparent and have airtight lids. This will help you see what’s inside and keep your food fresh.
- Label the containers: Once you have your containers, use labels to identify the contents. This will make it easy to find what you need and keep your pantry or refrigerator organized.
- Group similar items: Group similar items together in the containers. For example, you can store all of your baking supplies in one container and all of your snacks in another.
- Stack containers: Stacking containers can save space in your pantry or refrigerator. Choose containers that are the same size and shape so they can be easily stacked.
- Use containers for non-food items: Transparent containers can also be used for non-food items, like utensils or small appliances. This can help keep your countertops clutter-free.
- Keep containers within reach: Store your containers within easy reach so you can quickly grab what you need. For example, you can store your cooking oils and spices on a shelf above your stove.
Using transparent containers is an easy way to save space and stay organized in your small kitchen. By choosing the right containers, labeling them, grouping similar items, stacking them, using them for non-food items, and keeping them within reach, you can create a functional and efficient storage solution that works for you.
Conclusion
In conclusion, small kitchens can often present challenges when it comes to storage and organization. However, there are many creative and practical solutions that can help you maximize your space and keep everything tidy. From wall-mounted shelves and rolling carts to magnetic knife strips and drawer dividers, there are many different tools and techniques you can use to make the most of your limited space. By getting creative with pantry storage, utilizing the back of cabinet doors, and using transparent containers, you can transform your small kitchen into a well-organized and efficient space that meets all of your needs. With a little planning and some smart storage solutions, you can turn your small kitchen into a functional and beautiful space that you’ll love spending time in.