
Yoga, an ancient practice originating in India, offers numerous benefits for both the body and mind. One of the key aspects of yoga is its ability to enhance flexibility. Flexibility is vital for maintaining a healthy range of motion in our joints and muscles, preventing injuries, and improving overall physical performance.
Yoga poses, or asanas, specifically target different muscle groups, gradually improving their flexibility and elasticity. These poses gently stretch and lengthen the muscles, tendons, and ligaments, releasing tension and promoting suppleness. Regular practice of yoga not only improves flexibility but also helps to correct posture, increase body awareness, and promote relaxation.
Some common yoga poses for flexibility include the seated forward bend (Paschimottanasana), standing forward bend (Uttanasana), downward-facing dog (Adho Mukha Svanasana), bridge pose (Setu Bandhasana), and the butterfly pose (Baddha Konasana). These poses, when performed mindfully and with proper alignment, gradually increase the body’s flexibility over time.
Remember, flexibility is a journey, and it’s important to approach it with patience and respect for your body’s limits. With consistent practice and a mindful approach, yoga can be a transformative tool in enhancing your overall flexibility and well-being.
Why Focus on Flexibility?
Focusing on flexibility is important for several reasons:
- Injury Prevention: Improved flexibility helps to prevent injuries by increasing the range of motion in our joints and muscles. When muscles and connective tissues are more flexible, they are less prone to strains, sprains, and other injuries during physical activities.
- Enhanced Performance: Flexibility plays a crucial role in various physical activities and sports. It allows for greater agility, coordination, and fluidity of movement, leading to improved athletic performance. Increased flexibility can also enhance strength and power by enabling muscles to work through a full range of motion.
- Postural Alignment: Flexibility contributes to better postural alignment. Tight muscles can pull the body out of alignment, leading to poor posture and resulting in discomfort and pain. By improving flexibility, we can release muscle tension and achieve a more balanced posture, reducing the risk of chronic pain and musculoskeletal issues.
- Stress Relief and Relaxation: Flexibility-focused activities such as yoga often incorporate deep breathing and mindful movement. This combination promotes relaxation, reduces stress, and improves overall mental well-being. Flexibility training can be a valuable tool for managing stress and finding inner calm.
- Functional Daily Living: Flexibility is essential for performing everyday activities with ease and efficiency. Simple tasks like bending down to tie your shoes, reaching for objects, or getting in and out of a car can become more comfortable when you have good flexibility.
Overall, focusing on flexibility helps maintain a healthy body, enhances physical performance, promotes proper posture, reduces the risk of injuries, and contributes to a more relaxed and fulfilling lifestyle. It is a key component of overall fitness and well-being.
Top 7 Yoga Poses for Flexibility
1. Downward-Facing Dog (Adho Mukha Svanasana)
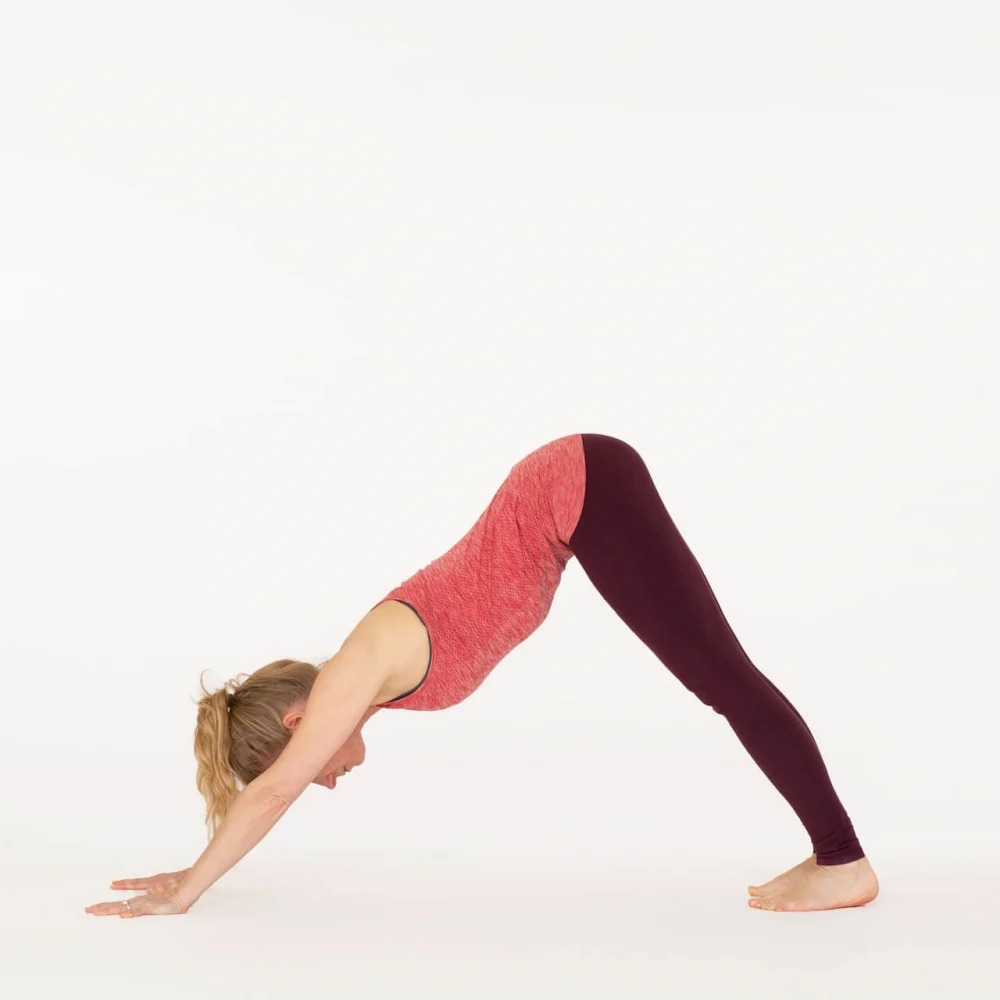
Downward-Facing Dog, or Adho Mukha Svanasana, is a popular yoga pose that stretches and strengthens various parts of the body. Here’s how to do it:
- Start on your hands and knees, aligning your wrists directly under your shoulders and your knees under your hips.
- Spread your fingers wide apart and press firmly through your palms, distributing the weight evenly.
- Tuck your toes under and exhale as you lift your knees off the floor, straightening your legs. Your body will form an inverted V shape.
- Engage your abdominal muscles and draw your tailbone up towards the ceiling, lengthening your spine.
- Press your heels towards the ground while keeping a slight bend in your knees. It’s okay if your heels don’t touch the floor.
- Roll your shoulders away from your ears and broaden your collarbones. Relax your neck and gaze towards your thighs or belly button.
- Take deep, steady breaths and hold the pose for 1-3 minutes, or as long as feels comfortable.
Downward-Facing Dog offers numerous benefits. It stretches and strengthens the entire body, particularly the hamstrings, calves, shoulders, and wrists. It also helps to lengthen the spine, relieve tension in the upper body, and improve posture. Additionally, it can help calm the mind, reduce stress, and increase overall energy levels.
Remember to modify the pose as needed by bending your knees slightly or using props such as blocks under your hands. As with any yoga pose, it’s essential to listen to your body and practice with mindfulness and respect for your own limitations.
2. Standing Forward Bend (Uttanasana)

Standing Forward Bend, or Uttanasana, is a beneficial yoga pose that stretches the entire backside of the body while promoting relaxation and releasing tension. Here’s how to do it:
- Begin by standing in Mountain Pose (Tadasana) with your feet hip-width apart and your arms resting alongside your body.
- Take a deep breath in and as you exhale, soften your knees slightly and fold forward from your hips, bending forward with a straight back.
- Allow your upper body to hang over your legs. If possible, try to bring your chest closer to your thighs. If your hamstrings are tight, it’s okay to keep a slight bend in your knees.
- Let your head and neck relax, allowing the weight of your head to gently pull your upper body deeper into the stretch.
- You can choose to hold onto your elbows with your hands, cross your arms and hold onto opposite elbows, or place your hands on the floor beside your feet.
- Breathe deeply and with each exhale, try to relax further into the pose, allowing gravity to gently stretch your hamstrings, calves, and lower back.
- Stay in the pose for 30 seconds to a minute, or longer if it feels comfortable. To come out of the pose, engage your core muscles, slowly lift your torso, and return to a standing position.
Uttanasana helps to release tension in the spine, stretches the hamstrings and calves, and increases flexibility in the hips and lower back. It also calms the mind, relieves stress, and improves digestion. As with any yoga pose, listen to your body, honor your limitations, and make modifications as needed to ensure a safe and comfortable practice.
3. Seated Forward Bend (Paschimottanasana)

Seated Forward Bend, or Paschimottanasana, is a seated yoga pose that stretches the entire back of the body, from the heels to the back of the head. It is a calming pose that helps to release tension and increase flexibility. Here’s how to practice it:
- Start by sitting on the floor with your legs extended in front of you. Sit up tall, lengthening your spine and engaging your core muscles.
- Take a deep breath in, and as you exhale, begin to fold forward from the hips, leading with your chest. Imagine reaching your heart towards your toes.
- Keep your back as straight as possible as you fold forward. Avoid rounding your back by hunching your shoulders or collapsing the chest. Instead, focus on maintaining a long spine.
- As you fold forward, reach your hands toward your feet or ankles. If you can’t reach that far, you can hold onto your shins or use a strap around the soles of your feet to assist your reach.
- Relax your neck, shoulders, and jaw. Allow the weight of your head to gently draw you deeper into the stretch.
- Breathe deeply and with each exhale, relax further into the pose, letting gravity help you deepen the stretch in your hamstrings, calves, and lower back.
- Hold the pose for 30 seconds to a minute, or longer if it feels comfortable. To come out of the pose, engage your core muscles, slowly lift your torso, and return to an upright seated position.
Paschimottanasana not only stretches the back of the body but also helps to calm the mind, relieve stress, and improve digestion. It can be modified by bending the knees slightly or using a prop such as a bolster or folded blanket under the hips for support. As always, listen to your body, respect your limits, and practice with mindfulness and breath awareness.
4. Butterfly Pose (Baddha Konasana)

Butterfly Pose, or Baddha Konasana, is a seated yoga pose that opens up the hips and stretches the inner thighs and groin area. It is a gentle and effective pose for increasing flexibility in the hips and promoting a sense of relaxation. Here’s how to practice it:
- Start by sitting on the floor with a straight spine. Bend your knees and bring the soles of your feet together, allowing your knees to fall out to the sides.
- Hold onto your ankles or feet with your hands. You can also place your hands on the floor behind you for support.
- Sit up tall and gently press your knees down toward the ground. If your hips are tight, you may find that your knees are higher off the floor. That’s perfectly fine. Avoid forcing the knees down and respect your body’s limits.
- Lengthen your spine and keep your chest open. Imagine a string pulling you upwards from the crown of your head.
- Relax your shoulders and jaw, allowing the muscles to release any tension.
- You can stay in this position, or for a deeper stretch, you can fold forward from the hips. Keep the spine long as you lean forward, reaching your chest towards your feet. Remember to go only as far as feels comfortable without straining.
- Breathe deeply and relax into the pose. Hold it for 1 to 3 minutes, or as long as feels good for you.
Butterfly Pose helps to increase flexibility in the hips, stretch the inner thighs, and stimulate the abdominal organs. It can also be beneficial for relieving menstrual discomfort and improving circulation. Remember to approach the pose with patience and respect for your body’s limitations. If you have any hip or knee injuries, it’s advisable to consult with a yoga instructor or healthcare professional before attempting this pose.
5. Camel Pose (Ustrasana)

Camel Pose, or Ustrasana, is a deep backbend that stretches the front of the body, opens the chest, and strengthens the back muscles. It is an invigorating pose that can increase flexibility and improve posture. Here’s how to practice it:
- Start by kneeling on the floor with your knees hip-width apart. Ensure your thighs are perpendicular to the floor.
- Place your hands on your hips, fingers pointing down towards the floor, with your thumbs at the sacrum to support your lower back.
- Inhale and lift your sternum upward, lengthening your spine. Engage your core muscles to support your backbend.
- Slowly start to lean back, keeping your chin tucked slightly towards your chest. Gradually slide your hands down your thighs, toward your ankles.
- Arch your upper back and let your head and neck relax, allowing them to gently fall back. Keep your gaze either forward or gently tilt your head back if it feels comfortable for your neck.
- If you can reach, you may place your palms on your heels or place your fingertips on the soles of your feet.
- Hold the pose for several breaths, allowing the front of your body to open and expand. Feel the stretch in your chest, abdomen, and thighs.
- To come out of the pose, slowly bring your hands back to your hips, engage your core muscles, and lift yourself back up to an upright kneeling position.
It’s essential to practice Camel Pose mindfully and with awareness. If you have any neck or back issues, it’s advisable to approach this pose with caution or consult with a yoga instructor for modifications or alternative poses. Remember to listen to your body, move within your limits, and never force yourself into a deeper backbend than feels comfortable for you.
6. Bridge Pose (Setu Bandhasana)

Bridge Pose, or Setu Bandhasana, is a rejuvenating backbend that strengthens the back muscles, stretches the chest and hip flexors, and promotes flexibility in the spine. It is a gentle pose suitable for practitioners of different levels. Here’s how to practice it:
- Lie on your back with your knees bent and feet hip-width apart, flat on the floor. Keep your arms alongside your body, palms facing down.
- Press your feet firmly into the floor, engaging your leg muscles. On an inhalation, lift your hips up towards the ceiling while keeping your feet and arms grounded.
- Roll your shoulders back and underneath your body, interlacing your fingers and pressing your arms into the floor. Alternatively, you can keep your palms flat on the floor for support.
- Lift your chest towards your chin, allowing the front of your body to open up. Keep your neck relaxed and gaze straight ahead or slightly upward.
- Press through your feet and arms, lifting your hips higher while keeping your thighs and inner feet parallel. You should feel a gentle stretch in your chest, hips, and thighs.
- Breathe deeply and hold the pose for 30 seconds to a minute, maintaining a steady, comfortable breath.
- To release the pose, gently lower your hips back down to the floor, one vertebra at a time. Unclasp your hands and rest your arms alongside your body.
Bridge Pose helps to strengthen the back muscles, improve posture, and counteract the effects of sitting for extended periods. It can also help relieve stress and fatigue, stimulate digestion, and increase overall energy levels. As with any yoga pose, practice with awareness and listen to your body. If you have any neck or back issues, modify the pose or seek guidance from a yoga instructor.
7. Extended Triangle Pose (Utthita Trikonasana)

Extended Triangle Pose, or Utthita Trikonasana, is a standing yoga pose that stretches the hamstrings, hips, and side body while promoting balance and stability. It also improves strength, flexibility, and posture. Here’s how to practice it:
- Begin by standing at the front of your mat with your feet about 3-4 feet apart. Turn your right foot out to the right, keeping your left foot slightly turned inward.
- On an inhalation, raise your arms out to the sides, parallel to the floor, with your palms facing down.
- Exhale and extend your torso to the right, reaching your right hand forward and then downward. Keep your torso long and avoid leaning forward or backward.
- Lower your right hand and place it on your shin, ankle, or the floor on the outside of your right foot. If you can’t reach the floor, you can use a block for support.
- Extend your left arm straight up toward the ceiling, creating a straight line from your left hand to your left foot. Your chest and hips should be open to the side.
- Gently turn your gaze upward, looking at your left thumb or straight ahead if it strains your neck.
- Keep both legs straight and engaged. Press through the outer edge of your back foot and ground through the inner arch of your front foot.
- Hold the pose for 30 seconds to a minute, maintaining smooth, steady breaths.
- To come out of the pose, press firmly through your feet and engage your core muscles. Inhale as you come back up to a standing position, then repeat the pose on the opposite side.
Extended Triangle Pose stretches the hamstrings, hips, groins, and side body while strengthening the legs and core. It can improve spinal mobility, digestion, and overall body awareness. Remember to practice with proper alignment, listen to your body, and modify the pose as needed. If you have any neck or shoulder issues, avoid looking up and instead keep your gaze straight ahead or downward.
Conclusion
In conclusion, practicing yoga poses for flexibility can bring numerous benefits to your physical and mental well-being. Whether you incorporate poses like Downward-Facing Dog, Standing Forward Bend, Butterfly Pose, Camel Pose, Bridge Pose, or Extended Triangle Pose into your routine, you’ll experience increased flexibility, improved posture, and enhanced strength. These poses target different areas of the body, stretching and opening up muscles, joints, and connective tissues. They also help release tension, improve circulation, and promote relaxation.
Flexibility is not just about physical benefits but also about cultivating a sense of mindfulness and body awareness. Each pose requires focused attention, deep breathing, and respect for your body’s limits. It’s important to honor your own boundaries and make modifications as necessary. As you continue to practice, you may notice gradual progress in your flexibility, allowing you to deepen your poses and explore new levels of flexibility.
Remember that yoga is a journey, and flexibility is a process that unfolds over time. It’s not about comparing yourself to others but about embracing your own unique journey and celebrating the progress you make on and off the mat. So, embrace the practice, be patient with yourself, and enjoy the transformative benefits that yoga and flexibility bring to your life.